OpenHRP3島嵗(偦偺3)
僐儞僩儘乕儔嶌惉
僐儞僩儘乕儔偺嶌惉傪峴偄傑偡丅WindowsVista偲VC2008偱嶌傝傑偡丅僒儞僾儖僾儘僌儔儉偼偙偙丅
傑偢丄RtcLink丒RtcTemplate 偑梫傝傑偡丅OpenRTM-aist偺RtcLink丒RtcTemplate偺僟僂儞儘乕僪偺儁乕僕偐傜丄慜晹擖傝僷僢働乕僕偺偄偪偽傫忋偺Eclipse3.2+RtcLink(0.4.1)+RtcTemplate(0.4.2)Windows梡慡晹擖傝傪僟僂儞儘乕僪偟偰夝搥偟偰丄岲偒側偲偙傠偵偍偄偰偔偩偝偄丅OpenHRP3.1.0beta偺僀儞僗僩乕儖偺偲偒偵偡偱偵擖傟偰傞偐側丠
OpenHRP3偺儁乕僕偵
"C:\Program Files\OpenRTM-aist\0.4\utils\rtc-template\rtc-template.py"
-bcxx ^ --module-name=SamplePD --module-desc="SamplePD component"
^ --module-version=0.1 --module-vendor=AIST --module-category=Generic ^
--module-comp-type=DataFlowComponent --module-act-type=SPORADIC ^ --module-max-inst=1
^ --inport=angle:TimedDoubleSeq ^ --outport=torque:TimedDoubleSeq
偲偄偆僷僢僠傪梡堄偟傠偲彂偄偰傞偺偱偲傝偁偊偢梡堄偟傑偡丅偙傟傪幚峴偡傟偽彑庤偵VC僾儘僕僃僋僩僼傽僀儖傪嶌偭偰偔傟傑偡丅
RtcTemplate偱嶌傞応崌偼埲壓偺傛偆偵擖椡偟傑偡丅
| Programming language selection | C++ | |
| 儌僕儏乕儖掕媊 | Module name | SamplePD |
| Module description | SamplePD component | |
| Module version | 0.1 | |
| Module vender | 偁側偨偺柤慜 | |
| Module category | Generic | |
| Component type | DataFlowComponent | |
| Component's activity type | SPORADIC | |
| Number of maximum instance | 1 | |
| InPort definition | angle | |
| TimedDoubleSeq | ||
| OutPort definition | torque | |
| TimedDoubleSeq | ||
| Output directory | 揔摉側僼僅儖僟 |
僾儘僕僃僋僩僼傽僀儖傪嶌偭偨僼僅儖僟偺copyprops偲偄偆僷僢僠傪幚峴偟偰偔偩偝偄丅
偦偺偁偲SamplePD_vc9.sln傪奐偄偰偔偩偝偄丅
偦偺偁偲丄壓偺恾偺愒偱埻傫偱偄傞偲偙傠傪Debug偐傜Release偵偟偰偔偩偝偄丅
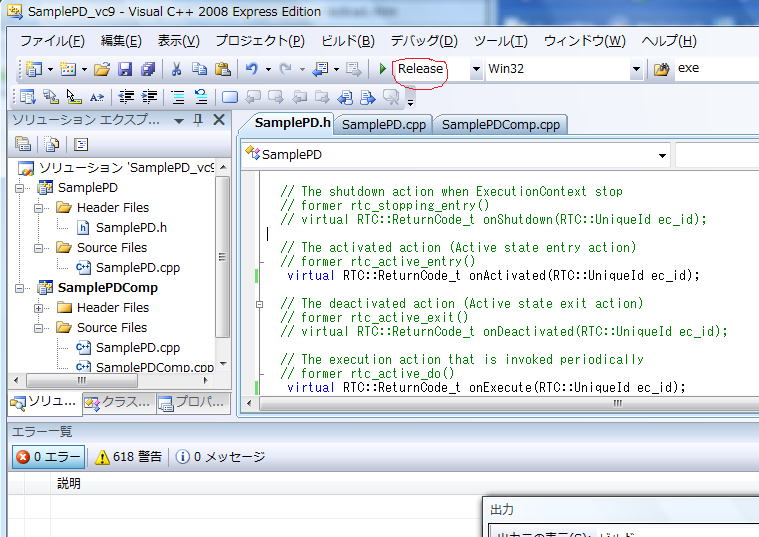
偦偟偰丄SamplePD.h偺150峴栚偺void SamplePDInit(RTC::Manager* manager)偺愭摢偵DLL_EXPORT傪晅偗壛偊偰偔偩偝偄丅
偁偲偼丄49峴栚偺virtual RTC::ReturnCode_t onInitialize()丄65峴栚偺 virtual RTC::ReturnCode_t
onActivated(RTC::UniqueId ec_id);丄73峴栚偺virtual RTC::ReturnCode_t onExecute(RTC::UniqueId
ec_id);偺僐儊儞僩暥傪偼偢偟偰偔偩偝偄丅
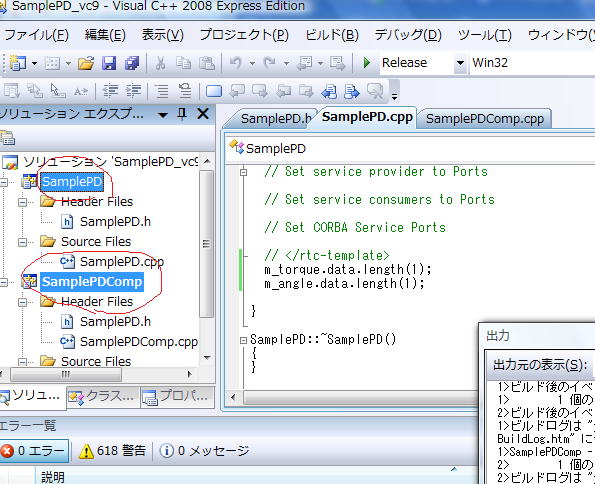
SamplePD.cpp偺50峴栚晅嬤偵 m_torque.data.length(NUM); m_angle.data.length(NUM);傪晅偗壛偊偰偔偩偝偄丅
偨偩偟丄NUM偼惂屼偡傞傾僋僠儏僄乕僞偺屄悢偱帺桼偵寛傔偰偔偩偝偄丅崱夞偼1偱傕偄偄偱偡丅
偁偲偼65峴栚晅嬤偺RTC::ReturnCode_t SamplePD::onInitialize()丄93峴栚晅嬤偺RTC::ReturnCode_t
SamplePD::onActivated(RTC::UniqueId ec_id)丄103峴栚晅嬤偺RTC::ReturnCode_t SamplePD::onExecute(RTC::UniqueId
ec_id)偺僐儊儞僩暥偼偢偟偰偔偩偝偄丅
onExecute(RTC::UniqueId ec_id)偵m_torque.data[0] = 0; m_torqueOut.write();偲晅偗壛偊偰偔偩偝偄丅
偙傟偱0斣偺傾僋僠儏僄乕僞偵0偺僩儖僋偑摥偒傑偡丅偡側傢偪幹宆儘儃僢僩偺僒儞僾儖偱偄偊偽愭摢偲2斣栚偺儕儞僋偺娫偺娭愡偑嬱摦偟傑偡丅
偁偲偼
偲SamplePD偲SamplePDComp傪慖戰屻丄塃僋儕僢僋偱價儖僪傪慖戰偟偰偔偩偝偄丅
僄儔乕偑0側傜惉岟偱偡丅寈崘偺悢偼婥偵偟側偄偱偔偩偝偄丅
偁偲偼3.0宯偱偁傟偽OpenHRP3偺僒儞僾儖僐儞僩儘乕儔偺SamplePD偺bridge.conf丄rtc.conf傪丄3.1宯偱偁傟偽SamplePD.bat偲rtc.conf傪僐儞僩儘乕儔嶌偭偨僼僅儖僟偺conponents偵僐僺乕偟偰偔偩偝偄丅
SamplePD偲柤慜傪晅偗側偑傜慡偔PD惂屼偟偰傑偣傫偑丄崱夞偼宍偩偗偟偐嶌傜側偄偺偱峔偄傑偣傫丅
偁偲偼Template丄bridge.conf(傑偨偼SamplePD.bat)撪偺柤慜傪曄偊傞偩偗偱偡偟丄C++偑偱偒傟偽惂屼梡偺僾儘僌儔儉傕彂偗傑偡丅
師夞偼GrxUI偱偙偺僐儞僩儘乕儔傪巊偭偰傒傑偡丅